Showing posts with label how. Show all posts

Friday, September 2, 2016

How To Check Your Drivers Version

You can easily identify what driver version you have by looking at the specific driver properties. You can access the driver properties via Device Manager which available on all Windows Operating System.

For this example I will show how to check the graphic driver version:

1. First you need to open device manager

2. Next right click on any devices you want, then select properties.
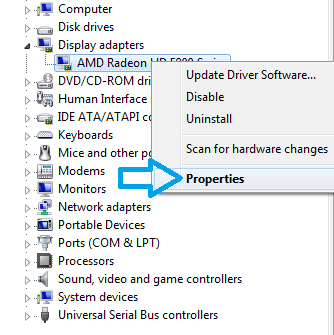

3. After that click on the Driver Tab and you will see the Driver Version will show what driver version currently installed for your graphic.
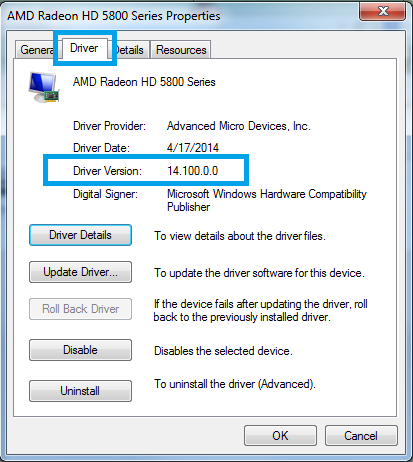

You can also identify the driver provider and driver dates. Digital Signer will show wither your driver is digitally signed or not.

Chipset Driver Version:
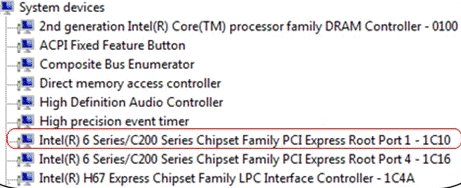
Certain devices not directly named as it should be such chipset is nowhere listed on the device manager. The chipset is categorize under system device, here is example Intel chipset 6 series:
Read More..

Monday, August 8, 2016

How to Disable Driver Signing Enforcement in Windows 8

Windows will prevent users to install drivers without digital signature so to enable drivers without signature installation you need to disable driver signing enforcement.

STEP 1
1. Press Windows key + R, when the "run" box appear type:

shutdown.exe /r /o /f /t 00


STEP 2
2. Before it restart, a start up setting screen will appear. Make the following selection:

Troubleshoot — Advanced options — Start Up Settings — Restart

STEP 3
3. Select " Disable driver signature enforcement" after reboot.
Read More..

Sunday, July 31, 2016

How to Identify Wireless Card Device

I feel it is important to write article about this matter since there are lots of reason for this and i think it is better to explain it in details. Nowadays, many laptop manufacture provide more than 1 wireless driver and ask you to choose base on your specification while there are no information given.

Content:
1. Simple way to Identify your wireless Card Device.
2. Identify your wireless using hardware ID. (Driver not yet installed)

1. Simple way to identify your wireless Card/Device.

(Driver already installed, if you still didnt install the driver look content no 2.)

1. Press windows + R button,  a windows "RUN" utility will open. (all windows OS)
2. To open device manager Type DEVMGMT.MSC and press enter or OK.


3. Device manager will open, look for Network Adapter and expand it.
Note 1: You can see your wireless name appear (red box in the picture).
Note 2: If it marked with yellow means you need to install the driver for it.


4. Right click on it and select properties, you will get more details about your wireless device.


2. Identify your wireless using hardware ID. (Driver not yet installed)


This 1 is simple, but if no drivers installed, you wont see the wireless name but it will list it as "network adapter", network device or else with yellow mark on it.

1. Right click on the network adapter marked with yellow.
2. Select properties - Details and on the drop down menu select hardware ID.

3. Copy the hardware ID and Google it, you will have more than one line, choose any line to search and you will see the result displaying the exact name for your wireless device. Example i use the 3rd line from picture above
4. Now, there are other result that discuss the same hardware ID in details and give the driver version to use for your device.

5. If your manufacture provide 3 different wireless drivers example Intel, atheros and broadcom, you can use this method to determine which to download and install.


Read More..

Thursday, July 28, 2016

How to Stop Windows Keep Automatically Installing Drivers

Whenever you plug in a new device, or windows found a new hardware, Windows will detect and automatically install available in-box compatible drivers. It will also search the drivers on the web or via Windows Automatic Updates. The problem with this setting is whenever you uninstall a device from device manager, it will keep re-install it after reboot or after you select "scan for hardware changes". A very good reason to uninstall the current driver from device manager permanently is varies such as:

1. Windows install the default driver which does not work. When we uninstall it to install different drivers, it will re-install the previous drivers before we able to install the other driver.

2. The default driver version which windows keep installing is newer then the version we want to use, so windows will prompt "the current driver version is newer than this package".

1 : OPEN GROUP POLICY EDITOR
Click start and on the search box type gpedit.msc and press enter. This will open Group Policy Editor.
Click yes if prompted


2: Go through (Expand by clicking the arrow button) : Computer Configuration -System - device Installation and Click device installation Restriction. The on the right pane double click on " Prevent Installation of devices not described by other policy setting".
Click to enlarge
3. Select enable, you can always change this setting by clicking disable (by default this option is not configured).
4. Reboot to apply this change. Now your computer will not automatically install the drivers you already uninstalled.
Read More..

Tuesday, May 31, 2016

How to Upgrade or Replace Your laptop GPU

It is not difficult to replace your laptop graphic card, the hard part is to upgrade where you need to identify which graphic is better and compatible with your laptop. So how to identify which graphic card is compatible? for this one you need to get advice from laptop graphic card seller and they will tell you what is the compatible graphic cards you can buy for you laptop model. You also can call the service center or Google the Video Cards replacement parts for your model or read the Manuals. For example HP NX9420 and NW series can use Nvidia FX 1500M over AMD Mobility Radeon X1600.

A. Upgrade and Replacement Process
Get your laptop service manual, you will need to read the part removal and replacement. You can get it from your laptop manufacture site. For this tutorial we will replace Acer Aspire 7720 With ATI Graphic Card.

1. Remove the back cover by loosen the screw and open the back compartment.
*Note : For othe model such as HP or DELL or other models, the removal might be slightly different. Please refer your manual.

2. Next step is to remove the heatsink. Unscrew the driver and carefully remove the heatsink.

3. Now loosen the Graphic Chipset Screw, and carefully pull to remove it from the slot.

4. Insert you new graphic and apply fair amount of thermal paste.

5. Lastly put the heat sink back in place and close the back compartment.


C. Things to consider before Upgrade/Replacement.
1.Normally if there is only a slight increase in graphic performance after upgrade. You cant expect to get from 256MB to 512MB. Normally 251Mb to 358MB is the highest replacement I ever know.

2. This method originally intend for replacement where lots of GPU is defect caused by high temperature.

3. Upgrade normally requires you to replace both Mainboard and GPU which costs more than a new laptop, so you better use that money to buy a new one instead of upgrading. Replacement on the other hand only requires a new the same new graphic chipset which is available on

4. If your graphic chipset is defect by overheating, make sure after the replacement the temperature is below 60 degree. Different graphic chip will produce different amount of heat and you need to observe the temperature carefully. Otherwise it will defect again after 30-days (or less).
Read More..

Friday, May 27, 2016

How to Install Old Soundmax Audio Driver in Windows 7

If you have an old laptop and install windows 7 on it, you may notice that your laptop have no audio. Sometimes device manager tells you it is installed and the volume bar work perfectly, but you can still hear no Sound. When you try to download the driver, your manufacture no longer provide updates for Windows 7, what is available only the old driver for Windows XP or Windows Vista.

Before we begin, Soundmax uses AC97 audio which is similar to Realtek AC 97 Audio. Try the AC97 audio first because sometime it did work on some model. Download Link

He is how to use that old Windows Vista or XP for Windows 7.

1. For this example we will install audio on IBM t42. First download your original XP Driver. (for t42 here is the driver: Download )

2.  Extract the driver file using 7zip or Winrar. Remember the path/location where we extract the driver file.

3. Now open device manager by click start and select run, type DEVMGMT.MSC

 
 2. Look at the audio controller and right and select update driver.


 3. Then select browse my computer for the Driver software

4.Click on browse and point to the driver folder we extracted ealier.

It will takes some time to find the driver file and install it. It will prompt i is not compatible but install it anyway.
Read More..

Saturday, January 30, 2016

How to Install Driver Without Internet Connections

Your PC and Notebooks/Laptop needs drivers after windows/OS installation. What we normally do is run automatic updates so windows will download and install  necessary drivers for our system. What if there are no internet connection? Example, you just finish installing windows 7 on your notebook but there are no wireless connection because the wireless drivers not yet installed. There are few ways we can install drivers without internet connection.

1. Use the Installation Disk/CD - (if you still have it)
Usually your computers comes with installation disk/CD/DVD, you may have more than one disk/CD/DVD. One of the disk contains drivers for your computers. What you need to do is insert the disk into CD/DVD-ROM and run the setup to install the drivers. You can identify the Drivers installation disk by looking at the cover written "drivers and utility" or similar.

2. Download from second device and transfer it to your computers.
If you have other device that do have internet connection, you can use it to download the drivers for your computers and transfer it via USB cable/ThumbDrive etc. Example, if you have an iPad, browse the internet and go the manufacture site and then search your model within the manufacture site. Download the drivers and transfer it to your computers.

3. Using Restore/Recovery CD.
Most notebooks manufacture provide recovery CD, insert your recovery CD and follow the on-screen instruction to complete the process.

4. Look for driver backup in your hard-disk (Sometimes Hidden)
This option available if you didnt wipe out your entire disk for windows installation. If you install windows Vista/7/8 over previous installation (install without formatting) or (upgrade), you will have a Windows.Old folder on your c drive. If you open that folder you will see your original files store in that folder. If you are using notebook there are a great chance that your drivers are in the folder. For example Hp product will have Swsetup folder in the windows.old drive, Dell will have dell folder, Toshiba will have "driver" folder, similarly with other laptop. Sometimes, you just did not notice the company already make drivers backup on your other partition (D/E).

5. Final Option - Cybercafe
This will cost you some dollars to go and download your drivers - store it in CD/external storage, but better than repair shop fee.

Best Practice:
Make sure to backup your drivers on Mass storage Device (pendrive/card reader/external hard disk etc) or CD/DVD for future use and never trash any recover/drivers CD provided by the manufacture.
Make sure you have all the drivers needed before installing new Operating System and check whether your manufacture support the Operating System of your choice or not.
Read More..